When your car experiences an electrical malfunction or fails to start, have you ever wondered how to test if the alternator is damaged? The alternator is crucial in keeping your car running smoothly by providing continuous power to vital systems and recharging the battery. When it starts to fail you’ll notice various electrical problems that can leave you stranded if ignored.
Fortunately, an alternator voltage test with a digital multimeter is an easy and reliable way to determine if your alternator is working properly. Generally a healthy alternator should read between 13.8V and 14.7V while the engine is running. Anything lower or higher means trouble. This guide will show you how to perform an alternator voltage test with a multimeter, what are the signs of alternator failure and when to replace.
What is an Alternator? What role does it play in a car engine?
The alternator is one of the most important components in your vehicle’s electrical system. In short it’s an electric generator that converts mechanical energy from your engine into electrical energy. While the battery provides the initial spark to start your car, the alternator keeps the electrical systems running once the engine is on.
How It Works: The alternator is connected to the engine via a belt and pulley system located near the front of the engine. As the engine runs it spins magnets within the alternator generating an alternating current (AC). This current is then converted to direct current (DC) to power electrical systems such as headlights, dashboard, radio and air conditioning while continuously recharging the battery.
Lifespan and Failure Factors
Most alternators last between 80,000 and 150,000 miles or approximately 7 years. However lifespan can vary depending on driving habits, climate and vehicle maintenance. In ideal conditions some alternators last the life of the car while others may fail prematurely due to various stress factors.
Several factors contribute to alternator failure:
- Worn-Out Internal Components: Bearings or brushes inside the alternator may wear out over time reducing power generation efficiency.
- Belt Problems: A broken, worn or slipping drive belt prevents the alternator from spinning properly.
- Contamination: Water, oil or other fluids leaking into the alternator can damage internal components.
- Environmental Strain: Moisture, excessive temperatures and vibrations accelerate wear.
- Electrical Overload: Heavy use of multiple electrical components at the same time puts additional stress on the alternator.
Furthermore a failing voltage regulator, a crucial component that controls electrical output, often leads to alternator malfunction. This can result in overcharging or undercharging the battery, both situations can damage your vehicle’s electrical system. Understanding how this part works helps you recognize symptoms before a full alternator failure occurs.
How to test an alternator with a multimeter?
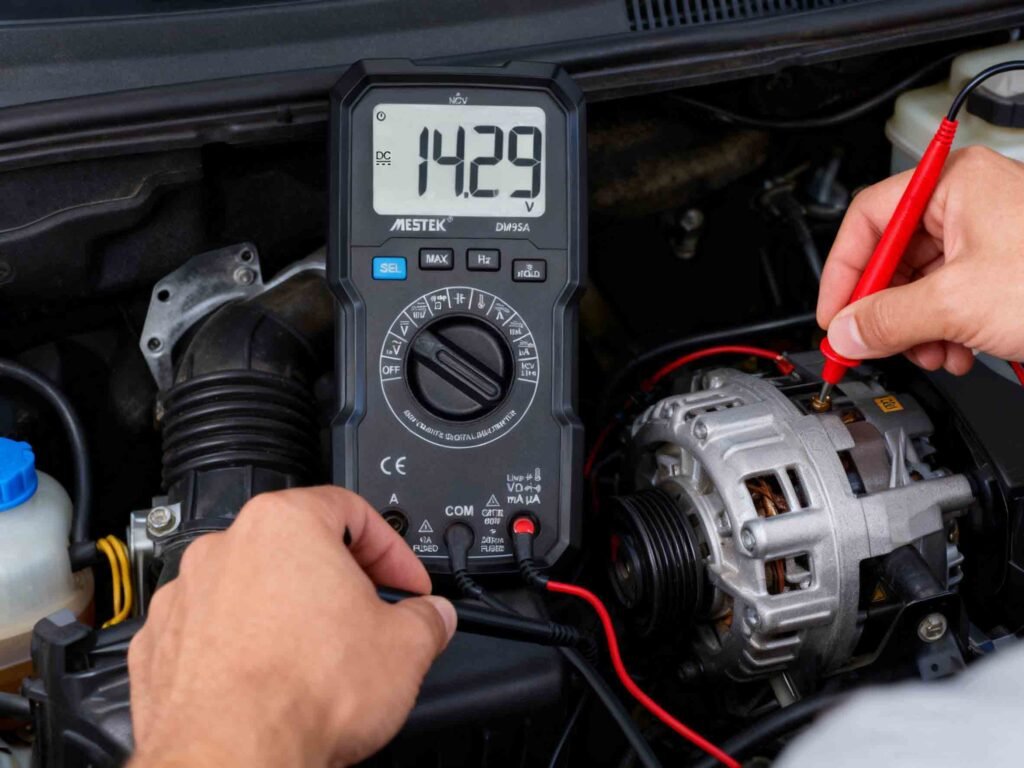
Testing your alternator requires minimal equipment but delivers valuable diagnostic information. A digital multimeter is the primary tool for this job, it gives you precise readings to determine if your alternator is working properly.
Tools You’ll Need
First prepare for the test by gathering the necessary equipment:
- A digital multimeter capable of measuring DC voltage
- Safety gloves (optional but recommended)
- Basic knowledge of your vehicle’s battery location
Step 1: Test the Battery Voltage (Engine Off)
Turn off the vehicle completely. Set your multimeter to DC voltage (V with a straight and dotted line). Select the 20V range if available. Connect the red probe to the battery’s positive (+) terminal and the black probe to the negative (–) terminal.
Record the voltage reading. A healthy battery should show a voltage reading between 12.4 and 12.6 volts. If the voltage is below 12V, charge the battery before proceeding. Otherwise you may get misleading results.
Step 2: Check Voltage with Engine Running
Start the engine and let it idle. Keep the multimeter connected to the battery terminals. The voltage should now read between 13.8 and 14.7 volts. This means your alternator is charging the battery properly. If the reading doesn’t rise or is below 13V it means your alternator is not charging correctly.
Turn on the headlights, radio and air conditioning. Observe the voltage drop. A healthy alternator should still read above 13 volts under load. If the voltage drops significantly your alternator might be struggling to keep up with electrical demands.
Step 4: Rev the Engine
Increase engine RPM to around 2000 for 15–20 seconds. Monitor voltage. It should read between 13.8–14.8 volts. If it goes above 15 volts you may have an alternator overcharging battery problem due to a faulty voltage regulator.
Step 5: Interpret the Results
- 13.8–14.7 volts: Alternator working perfectly.
- Below 13 volts: Alternator not charging battery properly.
- Above 15 volts: Voltage regulator issue causing overcharging.
Common symptoms of alternator failure

Recognizing the symptoms of alternator failure early can save you from unexpected breakdowns. These warning signs appear gradually giving attentive drivers time to address the issue.
1. Engine Misfires or Runs Unsteadily: If the alternator can’t provide consistent voltage ignition and fuel systems receive irregular current. You may experience engine misfires, rough idling or hesitation during acceleration.
2. Battery Warning Light Illuminates: The battery-shaped light (often labeled “ALT” or “GEN”) indicates voltage irregularities. If it stays lit after starting the engine the alternator may not be producing enough power.
3. Headlights Dim or Flicker: Dimming or flickering headlights especially at idle are classic signs of a weak alternator. Brightening during acceleration confirms inconsistent voltage output.
4. Electrical Components Malfunction: Power windows, radio and interior lights may behave erratically. These accessories draw from stored battery power when the alternator is not charging the battery and they fail as reserves deplete.
5. Engine Stalls or Shuts Off: Once the battery drains completely there’s no power left to keep the engine running. If your car stalls unexpectedly it’s a critical sign that the alternator has failed.
What to Do If the Alternator Fails the Test
After discovering a potential alternator problem several troubleshooting steps can help determine if repair or replacement is necessary.
Check for loose or corroded connections
Start with a visual inspection of electrical connections. Dirt and corrosion on battery and alternator connections make these components work harder to meet your vehicle’s electrical demands. Remove terminal leads and clean any corroded surfaces. Poor connections often mimic alternator failure. So make sure all wiring harnesses at the back of the alternator are secure and not damaged.
Check the alternator belt and pulley
Inspect the drive belt for signs of wear, cracks or stretching. A properly tensioned belt should feel slightly flexible but not too slack. Too loose it slips on pulleys; too tight it strains alternator bearings. Also manually rotate each pulley to verify smooth operation without wobbling or grinding. Damaged belts interrupt electrical flow and may loosen alternator mountings.
Consider replacing the voltage regulator
Sometimes the voltage regulator, not the entire alternator, needs replacement. This solid-state circuit controls voltage output. If voltage readings remain outside normal ranges despite clean connections and proper belt tension the regulator might be faulty. Replacing this component costs much less than a whole alternator.
When to replace the alternator
Replace the alternator immediately if symptoms persist after these checks. Continuing to drive risks stalling and damage to other electrical components.
For professional multimeter alternator testing visit Mestek Instrument for reliable diagnostic tools. Mestek multimeters ensure precise voltage readings and safe testing. Unless you’re experienced with automotive electrical systems, alternator replacement should be done by a qualified technician.
Alternator Replacement Cost
Replacing a faulty alternator involves significant cost that varies based on several factors. The average alternator replacement costs between $700.00 and $1,000.00 for most vehicles although prices can range from $350.00 to $900.00 depending on your situation.
This breaks down into two main components: parts and labor. The alternator itself costs between $500.00 and $750.00 and labor costs between $170.00 and $270.00. Mechanics charge between $85.00 and $175.00 per hour and the job takes about 2 hours to complete.
Several factors affect the final cost:
- Vehicle make and model (luxury cars often exceed $1,500.00)
- Alternator amperage requirements
- Mounting style specifications
- Electrical connection types
- Warranty coverage
Also, other components may need to be replaced along with the alternator such as the Serpentine belt (USD 70.00-200.00 installed), Tensioner or idler pulleys and the Battery (if damaged due to alternator failure).
Although it’s costly, replacing your alternator now prevents more costly damage to your vehicle’s electrical system. For budget-conscious owners remanufactured alternators are a more affordable option than brand new ones as long as they match your vehicle’s specifications.
FAQs
1) What Voltage Should a Car Alternator Produce?
A proper alternator voltage test should show 13.8V–14.4V while the engine is running. This range means the alternator is charging the battery without overloading it. Anything below 13V or above 15V means the alternator is not regulating voltage correctly.
2) How Do I Know If My Alternator Is Bad?
Watch for warning signs such as dim headlights, dead battery or voltage dropping below 13V during testing. A multimeter alternator test reading showing low voltage usually means bad alternator.
3) Can I Test an Alternator Without a Multimeter?
Yes, but not recommended. Some people disconnect the battery while the engine runs. If the engine stalls it means a bad alternator. But this method can damage the vehicle’s ECU and electronic components. A digital multimeter is the safest and most accurate way to test alternator output.
4) What If My Alternator Shows More Than 15 Volts?
A reading above 15V means faulty voltage regulator. Overcharging can overheat the battery, corrode terminals and reduce lifespan. Replace the regulator immediately to avoid further electrical issues.
5) Does a Dead Battery Mean the Alternator Is Bad?
Not necessarily. A dead battery might be due to leaving lights on, extreme cold or old battery. But if the battery dies repeatedly even after replacement your alternator is not charging it properly.
6) How Often Should I Check My Alternator?
It’s recommended to check the alternator every 6 months or at least once a year during maintenance. If you notice power fluctuation, dimming lights or a clicking noise test car alternator immediately.
Conclusion
Testing your alternator regularly can save you from costly repairs and roadside breakdowns. A simple multimeter alternator test reading helps determine whether your alternator maintains the essential 13.8–14.7V range. You can diagnose and fix issues before they get worse by knowing how to tell if an alternator is bad. Always check connections, belts and voltage regulators before replacing your alternator outright.
If your alternator consistently underperforms, investing in professional-grade testing tools from MESTEK Instruments ensures accuracy and confidence in your diagnosis. Remember, your alternator powers every electrical function in your vehicle. Routine testing and timely maintenance not only extend its life but also keep your vehicle running safely and efficiently for years to come.