Did you know most factory paint jobs on vehicles are only 4–7 mils (100–180 microns) thick? That’s thinner than a sheet of printer paper. When you consider the stakes during automotive detailing where one wrong move can permanently damage a vehicles finish, this thin margin becomes critically important.
When buffing or polishing a car, detailers walk a fine line between getting the perfect shine and removing too much clear coat. Manufacturers generally recommend removing no more than 0.3 mils (8 microns) during polishing to avoid compromising UV protection. Without an accurate reading of paint thickness, you’re essentially working blind, and that’s risky.
This is where car paint thickness gauges (PTGs) come in. They are essential tools for precision detailing, helping you protect the vehicle while still getting great results. This article will cover everything professionals need to know about paint thickness measurement from selecting the right gauge to interpreting the readings.
What is Automotive Detailing?
Paint detailing, in relation to paint thickness measurement, involves the systematic cleaning, rejuvenation, and protection of a vehicle’s exterior painted surfaces. The goal is either to preserve the look of newer vehicles or to restore the look of older, neglected ones.
Cleaning is the first step, focused on removing dirt, dust and other loose contaminants. This not only makes the vehicle look better but also allows for a clear inspection of the current paint condition. Rejuvenation is focused on restoring the vehicle’s finish to a showroom like state. The extent of this process depends on the owner’s preferences and desired results. Protection is maintenance treatments such as waxing which help keep the paint looking fresh for as long as possible after the detailing process.
What is paint thickness in auto detailing
Modern automotive paint is complex, it has multiple layers that provide both esthetic appeal and protection. Understanding these layers is key to good detailing work.
What is paint depth and why does it matter
Paint depth refers to the total thickness of all paint layers on a vehicle’s exterior. This is important because detailing processes – especially buffing and polishing – remove small amounts of paint. Without proper measurement detailers risk removing too much material and exposing lower layers.
For professionals, paint depth knowledge serves multiple purposes. First, it helps prevent damage during polishing by setting safe working parameters. Second, it helps identify repainted or repaired areas on a vehicle, as these typically read higher than factory paint. Paint thickness gauges (PTGs) are “big picture indicators” that tell detailers whether aggressive correction techniques are safe to use.
Clear coat vs. base coat: What are you measuring?
Modern automotive finishes have three main layers:
- Primer: Seals the metal body and prevents oxidation (0.3-1.5 mils / 8-38 microns thick)
- Base coat: Delivers color, typically measuring 0.5–1.5 mils (13–38 microns) in thickness.
- Clear coat: Offers UV protection and glossy appearance (1.5-4 mils / 38-102 microns thick)
The clear coat is about 40% of the total paint thickness. This is the layer detailers work with during polishing. However, standard paint thickness gauges measure the combined thickness of all layers – they can’t differentiate between individual coats.
Common paint thickness ranges on factory vehicles.
Factory paint thickness varies by manufacturer but generally falls within these ranges:
- Most factory paint finishes range from 4 to 7 mils (100–180 microns) in thickness.
- Since 2016, global manufacturers average 110-125 microns (4.3-4.9 mils)
- American manufacturers like Ford and GM typically produce vehicles with thinner paint, often 95-105 microns (3.7-4.15 microns)
- Pearlescent finishes will read 10-15% higher
- Edges will read 25-50% thinner than flat panels
Readings below 75 microns (3 mils) are a major concern and generally mean paint correction should be avoided.
Why Use a Car Paint Thickness Gauge

Car paint thickness gauges have become essential tools for professional automotive detailers. These precise instruments provide critical data that informs both process and expectations for vehicle paint correction.
Preventing damage during polishing or sanding
Factory clear coats are remarkably thin, often comparable to the thickness of a Post-it note. Without proper measurement, detailers risk “burning” through the clear coat during aggressive polishing. Professional detailers use these gauges as Big Picture Indicators to make go or no-go decisions before correction. For example, vehicles with readings below 75 microns (3 mils) should not be corrected aggressively.
Repainted or repaired areas
A big difference in readings between adjacent panels tells you there was previous bodywork. For example, if the driver’s door reads 110 microns but the fender reads 220 microns, that fender was repainted. If there’s overflow it means body filler was used in previous repairs. Experts say a 40 micron or higher difference between adjacent panels is a red flag.
Consistent detailing
First of all, using paint thickness gauges shows you’re a pro. Secondly, these tools preserve the UV blockers in the clear coat as manufacturers recommend removing no more than 0.3 mils (8 microns) during correction. Detailing businesses reduce liability, increase efficiency and maintain their reputation by doing this 10 minute inspection before every paint correction service.
How to Measure Paint Thickness on Different Surfaces
Paint thickness measurement depends on the substrate material beneath the paint. Different vehicle surfaces require different gauge technologies to get accurate readings.
Steel panels: magnetic probes
Magnetic gauges only work on ferrous (iron containing) panels through magnetic attraction. These tools measure how the paint layers affect the magnetic field between the probe and steel substrate. Basic pull-off gauges use a calibrated spring and permanent magnet electronic magnetic gauges provide digital readings with more precision. To use, place the probe flat on the surface, hold steady until you hear a beep, then lift between measurements.
Aluminum panels: eddy current
For non-ferrous metals like aluminum eddy current technology is required. These gauges generate a high frequency alternating current that induces eddy currents in the metal. The paint thickness is determined by how these currents are affected by the coating. Note that electrical conductivity and part curvature affect readings – modern gauges have conductivity and curvature compensation for accuracy.
Plastic bumpers: ultrasonic probes
Since magnetic and eddy current gauges can’t measure non-metal substrates, ultrasonic technology is required for plastic components. Ultrasonic gauges send sound waves through the coating using a couplant gel. The measurement process is:
- Apply a drop of couplant gel to the surface
- Place the probe flat on the gel and press down
- Lift when you hear a double beep
Zeroing and calibration tips
Calibration ensures measurement reliability. Zero calibration compensates for temperature effects and probe wear. For ultrasonic gauges, zeroing is done in air not on metal. Verify accuracy using plastic shims of known thickness. Recalibrate when changing batteries or when ambient temperature changes dramatically.
How to Use Car Paint Thickness Gauge for Better Automotive Detailing
Proper technique ensures accurate paint measurements that inform your detailing decisions. Follow a systematic approach with each gauge type for maximum reliability across different vehicle surfaces.
Step-by-step for magnetic and eddy current gauge
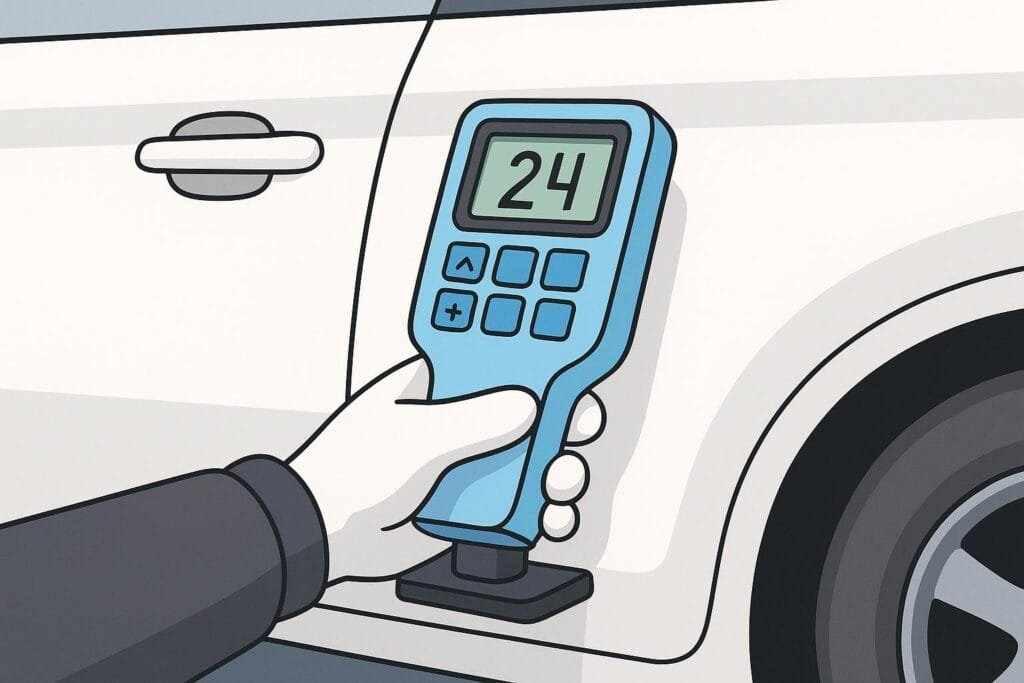
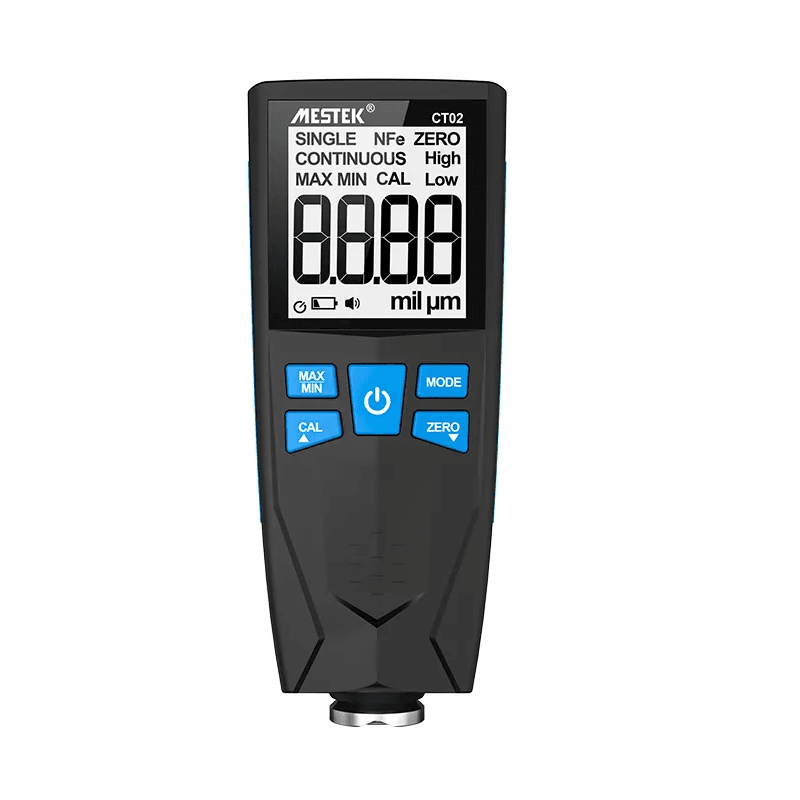
Turn on the gauge. Place the probe flat on the clean surface. Hold steady until the gauge beeps. Between readings lift the probe at least 2 inches (5cm) from the surface or leave it in place for continuous measurements every 2 seconds. Don’t drag the probe sideways as this may damage the instrument and vehicle finish.[See MESTEK Automotive Paint Thickness Gauge CT02C].
Using ultrasonic gages with couplant
Apply a small drop of glycol gel couplant (included with most gauges) to the surface. Place the probe flat on the couplant-covered area. Press down firmly to initiate measurement. When you hear a double beep or see a green indicator light lift the probe to hold the reading on the display. Then, use a soft cloth to clean both the probe and the surface.
How to verify gage accuracy before use
Before daily use, measure an uncoated metal piece for a quick zero-check. Then place calibration shims of known thickness on bare surfaces and measure individually to confirm accuracy.
Tips for measuring on curved or small surfaces
On curved panels keep the probe flat against the surface. For small areas use specialized “thin tip” probes. Convex or concave surfaces may require curvature compensation probes for accurate readings. Motorized measurement stands are helpful for very thin coatings.
How to read and what it means
Standard gauges measure total coating thickness, including primer, base color and clear coat combined. Higher than normal readings usually mean repainted areas or body filler. “Overflow” messages may mean excessive thickness, body repair work or overspray. “No Metal” readings usually mean composite materials or plastic fillers like Bondo.
Choosing the right car paint thickness gauge
Choosing the right car paint thickness gauge depends on the vehicle materials you’ll be measuring most often. Each technology has its advantages for different automotive surfaces.
When to use magnetic vs eddy current
Magnetic gauges work on steel panels by measuring magnetic attraction through paint layers. They are accurate within ±1-3%. Eddy current gauges measure non-magnetic metals like aluminum by generating electromagnetic fields and sensing the opposing field created by eddy currents.
Most professionals use combo units that have both magnetic and eddy current technology and automatically switch between measurement principles based on the substrate.
Why is ultrasonics necessary for plastic parts
Unlike conventional magnetic or eddy current gauges that only work on metals, ultrasonic technology enables measurement on plastic bumpers, fibreglass panels, and interior components. Ultrasonic gauges send high frequency sound pulses through a couplant gel applied to the surface. The pulse reflects back from density differences and allows thickness calculation based on travel time.
Before measuring coatings on plastic required destructive testing or indirect methods like placing metal coupons alongside plastic parts.
Gage accuracy and resolution
Resolution, how small a change the gauge can detect, directly affects measurement precision. A gauge with 0.001 mil resolution provides more detailed readings than one with 0.01 mil resolution. Equally important is the measuring range (minimum/maximum thickness) and accuracy specification usually displayed as ±(3%+1μm). See MESTEK CT02 specifications.
Higher end gages have features like memory storage, USB connectivity and multi language support. Calibrate with known thickness standards regularly to ensure ongoing measurement reliability.
Conclusion
In automotive detailing, precision is protection. A paint thickness gauge isn’t just a measuring device. It’s a safety net for your client’s investment and your reputation. With the right gauge, calibration and knowledge you’ll avoid costly mistakes, deliver perfect finishes and be the detailer who is an artist and a scientist.
Ready to take your detailing to the next level? Get a professional grade gauge that measures steel, aluminum and plastic. The Mestek CT02C Coating Thickness Gage has the accuracy, versatility and durability for today’s automotive materials.
Click here to get your Mestek CT02C now and start detailing with confidence.