nfrared thermometers have become essential tools across many industries — from HVAC maintenance and automotive diagnostics to food safety and scientific research. Yet, one critical factor often misunderstood by many users is emissivity. Understanding emissivity in infrared thermometers is key to achieving accurate and reliable temperature measurements.
What Is Emissivity?
Emissivity refers to a material’s ability to emit infrared radiation compared to that of a perfect blackbody (which has an emissivity value of 1.0).
In simple terms, emissivity is a measure of how efficiently an object radiates heat.
High emissivity (close to 1.0): The object emits most of its heat. Typical of non-reflective materials like wood, water, and painted surfaces.
Low emissivity (below 0.5): The object reflects more infrared energy than it emits. Common with shiny metals and reflective surfaces.
Why Emissivity Matters in Infrared Thermometer
Infrared thermometers rely on infrared radiation, not direct contact, to determine temperature. Since each material emits radiation differently, the emissivity setting helps the thermometer interpret readings correctly.
For example:
A painted steel surface (high emissivity) might show a correct reading at an emissivity of 0.95.
A polished aluminum surface (low emissivity) may require an adjustment to 0.30–0.40.
If emissivity is not properly set, your infrared thermometer could misread temperature by tens of degrees, especially on reflective materials.
Fixed vs Adjustable Emissivity Thermometer
Infrared thermometers are generally divided into two types based on emissivity settings:
- Fixed emissivity (usually 0.95)
These are simpler and more affordable. They work well for organic materials, painted surfaces, food, and human skin — all of which have emissivity values close to 0.95. - Adjustable emissivity (0.10–1.00 range)
These models are preferred by professionals because they allow precise calibration for various surfaces, improving accuracy when measuring metals, plastics, or glass.
Precision and Flexibility in Emissivity Adjustment
One excellent example of an adjustable emissivity infrared thermometer is the
MESTEK IR02C Infrared Thermometer.
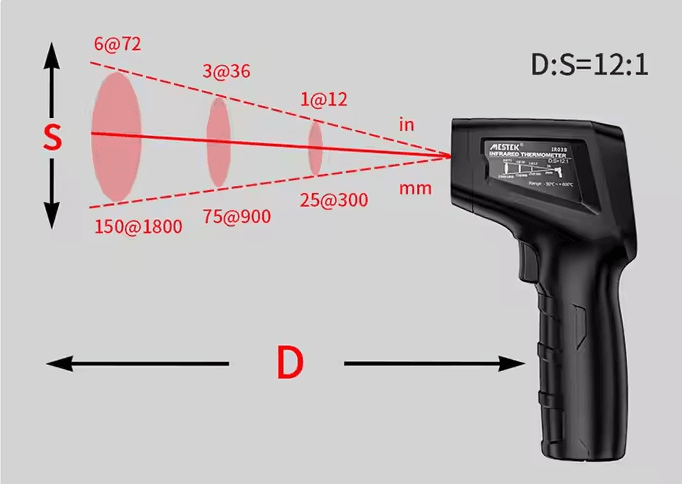
The IR02C supports adjustable emissivity from 0.10 to 1.00, allowing users to match the correct setting for different materials easily. It features a wide temperature range suitable for industrial and HVAC use, a fast response time (<0.5s), laser targeting, and a high D:S ratio (12:1) for long-distance accuracy.
These features make it ideal for users who frequently measure both high-temperature metallic surfaces and non-metallic materials like concrete, rubber, or painted equipment.
By adjusting emissivity based on the surface, you can eliminate reading errors and ensure data consistency across different environments.
How to Set the Correct Infrared Thermometer Emissivity
- Check your material type — Identify whether it’s shiny, matte, painted, or coated.
- Find the emissivity value — Refer to the emissivity table below.
- Adjust the thermometer — If your device allows, set the emissivity manually to match the material.
- Test and fine-tune — Take a few readings and compare with a contact thermometer if available. Adjust until readings align.
- Avoid reflective errors — When measuring shiny metal surfaces, apply a piece of non-reflective tape (like electrical tape) and measure the taped area..
Emissivity Reference Table
These values are approximate and can vary depending on surface condition, temperature, and oxidation level.
| Material | Emissivity | Material | Emissivity |
| Aluminum, polished | 0.05–0.10 | Aluminum, oxidized | 0.25–0.30 |
| Asphalt | 0.90–0.98 | Brass, polished | 0.03–0.05 |
| Brass, rough surface | 0.50–0.60 | Brick | 0.90–0.94 |
| Concrete | 0.93–0.97 | Copper, polished | 0.02–0.05 |
| Copper, oxidized | 0.70–0.80 | Glass | 0.85–0.95 |
| Ice | 0.96–0.98 | Iron, cast | 0.80–0.90 |
| Iron, oxidized | 0.74–0.78 | Painted surface | 0.95 |
| Paper | 0.93–0.96 | Plastic, PVC | 0.91–0.94 |
| Rubber | 0.90–0.95 | Sand | 0.90 |
| Stainless steel, polished | 0.10–0.20 | Stainless steel, oxidized | 0.60–0.85 |
| Steel, rolled | 0.75–0.85 | Steel, painted | 0.90–0.95 |
| Water | 0.93 | Wood | 0.90–0.94 |
Tips for Accurate Temperature Measurement
- Keep the lens clean: Dust or smudges can distort infrared readings.
- Avoid steam or smoke: These can scatter IR radiation and lower accuracy.
- Measure perpendicular to the surface: The closer to 90°, the more accurate the reading.
- Allow time for stabilization: Sudden temperature changes can affect the sensor.
- Choose the right D:S ratio: For small targets, use a thermometer with a high distance-to-spot ratio like 12:1 .[See MESTEK IR02C].
Applications of Emissivity Adjustment

Adjustable emissivity infrared thermometers are crucial. Correctly configuring emissivity ensures reliable data and energy efficiency, providing significant advantages in each of these applications.
- Industrial inspection – Detecting overheating in motors, bearings, or transformers.
- Automotive diagnostics – Checking engine parts, brake systems, and exhaust components.
- HVAC maintenance – Verifying airflow temperature, duct insulation, and equipment efficiency.
- Food safety – Ensuring cooking and storage temperatures are within safe limits.
- Building inspection – Detecting insulation loss, leaks, and moisture accumulation.
Conclusion
Understanding emissivity in infrared thermometers is not just a technical detail — it’s the foundation of accurate non-contact temperature measurement. Whether you’re measuring industrial machinery or inspecting building materials, the correct emissivity setting ensures trustworthy results.
If you often work with mixed materials and varying surfaces, choosing an adjustable-emissivity model like the MESTEK IR02C Infrared Thermometer will help you capture precise, repeatable data every time.