This is a guide to choosing an infrared thermometer, analyzing 8 aspects such as usage scenario, emissivity, object distance ratio, etc. We will guide you through the key features to consider when buying an infrared thermometer to ensure that you choose a device that meets your needs.
General application scenarios:
In cooking and kitchen use, in most cases you only need to measure in the range of -50°C to 300°C (-58°F to 572°F). This is a more general standard, so choosing a high-temperature thermometer at this time is not cost-effective. Of course, if this is not your only use, then you can choose a thermometer that measures more temperatures. For home maintenance, when checking insulation or HVAC (air conditioning and heating system), it is recommended to use a wider range between -30°C to 600°C (-22°F to 1112°F), which is also the result of communication with professional maintenance workers. For high temperature environments, please choose a device that can measure up to 1000°C~2000°C (1832°F~3632°F) or higher. This situation is more special. If you need a deeper understanding of high temperature thermometers, please refer to “Infrared thermometer that challenge high temperatures”.

Is the emissivity of an infrared thermometer important?
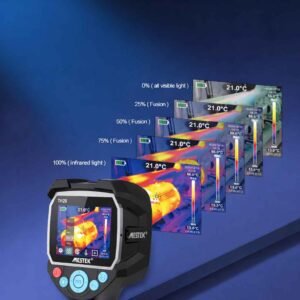
The answer is of course, emissivity defines the efficiency of a surface in emitting infrared energy. Infrared thermometers have adjustable emissivity settings (usually 0.1 to 1.0). Measurement accuracy on different materials:
| Frequency | Emissivity | Material |
| Low emissivity | 0.1~0.3 | Shiny metals |
| Medium emissivity | 0.3~0.7 | Non-metallic materials |
| High emissivity | 0.7~1.0 | Organic materials, painted surfaces |
For multi-functional use, a thermometer with an adjustable emissivity feature should be selected to improve measurement accuracy on a variety of materials.
Distance to Object Ratio (D:S)
Simply put, it is the relationship between the target distance and the diameter of the measurement area. A higher D:S ratio can get accurate readings from a greater distance.
| 8:1 | Measure 1-inch area from 8 inches away | Kitchen, car maintenance, appliance maintenance |
| 12:1 | At 1.2 meters away, the measurement point diameter is about 4 inches | HVAC, appliance maintenance |
| 20:1 | The measurement point diameter is about 4 inches | Electrical fault, industrial detection |
| 50:1 | At 5 meters away, the measurement point diameter is only 10 cm 4 inches | High temperature, high-risk industrial scenarios |

Backlight display
A clear backlit display is essential for readability in low-light environments. Imagine having to use a thermometer to measure your HVAC when the power goes out and the screen is barely visible.

Data recording capability
For professionals and industrial users, a thermometer with data logging or memory storage capability offers the advantage of being able to track and analyze temperature trends over time. This feature is particularly useful for quality control, maintenance checks, and laboratory work.
Response speed
Fast response time is crucial in scenarios where immediate results are needed. The most common use is in cooking and kitchen use. When the infrared thermometer has a response time of 0.5 seconds or less, the experience will be completely different.
Why is it difficult for ordinary infrared thermometers to measure liquids?
Infrared thermometers determine the temperature by detecting infrared radiation on the surface of an object. However, transparent liquids (such as water and alcohol) are easy to penetrate with infrared radiation, making it difficult for the thermometer to capture the radiation signal on the surface. Choose a thermometer with a thermocouple probe that can be directly inserted into the liquid to avoid this error.

Other
Other features such as automatic shut-off and environmental readings (ambient temperature and humidity) can enhance usability and convenience. You can consider them when choosing.