Do you really understand moisture meter?


You have prepared all the materials for DIY your house.

But whether the environment you live in is humid or too dry. This has become your current problem.

Because you can’t adapt them to the environment.

Too humid ground will make the wood board moldy and spotty in a short time, while too dry will make the wood board crack.

Don't worry, a short article will help you choose the moisture meter that's right for you.

Pinless moisture meters and pin-type moisture meters are the two most common moisture measuring instruments. Pin-type moisture meters can be directly inserted into the wood or material to be measured. The instrument measures the resistance between the built-in pins through electrodes. The size of the resistance is affected by the moisture content of the material. By observing whether the resistance is close to the standard value of the material, it can be judged whether the wood or material meets the standard.

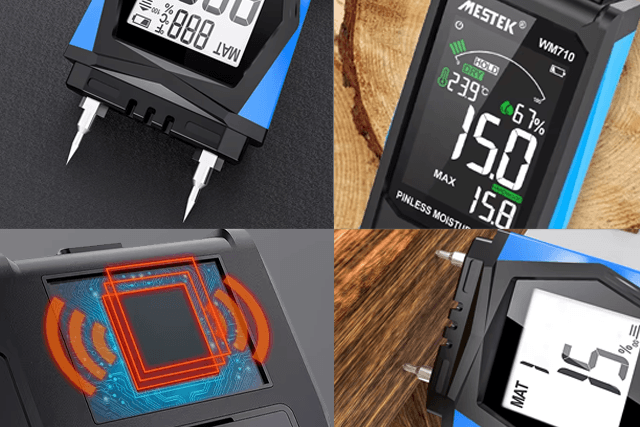
The working principle of the pinless moisture meter is relatively simple to understand. Its electrode plate only needs to contact the surface of the material to work, and the relative moisture content of the material is measured by the generated electric field. The working principles of these two moisture meters are basically the same.

So, what is the right moisture meter for you?

First, make your goal clear. If you just need to know the moisture content of your concrete floor, then you can choose a pin-type moisture meter. Even if the measurement process will leave holes in your floor, it will eventually be covered by your wooden boards, so you don’t have to worry about it.

The ASTM standard is that the relative humidity of concrete should be less than 75%. Of course, this is not the only standard. You also need to know what humidity the material you purchased can withstand? You can ask the manufacturer, usually find this information on the wood manufacturer’s website. After waiting for the concrete to reach the appropriate ambient humidity, you can decorate your room as you like. When you are preventing the wood wall from getting moldy and spots, and you don’t want a pin-type moisture meter to leave a bunch of holes after measuring, then a pinless moisture meter will be your best choice.

Time and effort are two important factors when choosing a moisture meter.

Time and effort are two important factors when choosing a moisture meter.

  • The volume of wood you work with and the time it takes to measure with the meter.
  • You need to repeatedly measure the moisture content of the wood to experiment.
  • You need to handle a lot of wood regularly.
  • You don’t have time to learn how to change the pins on a hygrometer.
  • The material you are working with is hard, such as hardwood

In this case, a pinless moisture meter is more suitable because your energy should not be wasted repeatedly inserting the pin into the wood.

  • You only have to deal with less wood.
  • You may only need to take a few simple instrument readings.
  • The wood you treat will easily fit the pins.

Then, the needle moisture meter will be the best choice, it is relatively simple to operate


Next, I will recommend you a more practical moisture meter, a moisture meter with a spherical probe.

It is also a pinless moisture meter, but it is more convenient and quick to use, and it has a unique ball shape. It has a unique way of calculating the moisture content of four materials, namely drywall, concrete, cork, and hardwood. After you get the standard moisture content of this material, you can set it to a dangerous or warning state, and it will issue a warning when it reaches this value.

Share our interesting knowledge and stories on social media

Have questions? Get a quote

Want to learn more? Click the button now.

More Posts>>>

Learn how to identify line and load wires safely. Use a multimeter or voltage tester to understand wiring differences and avoid hazards.

How to Identify Line and Load Wires Safely and Accurately

Understanding the difference between line and load wires is essential for anyone working with electrical systems. Whether you are installing a switch, replacing an outlet, or troubleshooting a circuit, correctly identifying line and load wires helps prevent electrical hazards, equipment damage, and wiring errors. What Are Line and Load Wires Before identifying wires, it is important to understand their roles in an electrical circuit. What Is a Line Wire? The line wire carries electrical power from the power source (such as a breaker panel) to a device. It is the incoming energized conductor that supplies voltage to switches, outlets, or

The image shows what an infrared thermal imager is.

What Is an Infrared Thermal Imaging Camera?

What if you could see heat instead of light? An infrared thermal imaging camera makes that possible. It detects invisible heat energy and turns it into a visual image of temperature differences. Unlike regular cameras that rely on visible light, thermal cameras work in total darkness. They can also operate in smoke, fog, and other low-visibility conditions. Thermal cameras are widely used in electrical inspections, industrial maintenance, and building diagnostics. They help professionals detect problems the naked eye cannot see, such as overheated wires or hidden heat loss. This guide explains how infrared thermal imaging works, what it can detect,

The picture depicts a worker using a multimeter to check for socket malfunctions.

How to Use a Multimeter to Check a Faulty Socket

Household sockets can stop working for several reasons, including loose wiring, a blown fuse, tripped circuit breakers, or worn out internal connections. Sometimes the problem is obvious, but often it requires proper testing to confirm whether the socket itself is faulty. That’s where understanding how to use a multimeter to check a faulty socket becomes essential. A multimeter is one of the easiest and most reliable tools for diagnosing electrical outlet problems. It can measure voltage, resistance, and continuity, helping you determine whether power is reaching the socket and whether the internal wiring is intact. This article explores everything you

The diagram illustrates the tools needed to test a relay using a multimeter.

How to Test a Relay with a Multimeter

Relays are small but essential components used in cars, appliances, HVAC systems, industrial equipment, and countless electronic devices. Their job is simple: they use a low power signal to safely and efficiently control a higher power circuit. Because relays switch electrical loads, they experience wear over time. Burnt contacts, damaged coils, or internal mechanical failure can cause them to stop working correctly. When a device suddenly stops turning on or won’t turn off, a faulty relay is often the cause. Fortunately, diagnosing a relay is not complicated. A digital multimeter is the easiest and most reliable tool for checking relay

Get more information

Scroll to Top